GET STARTED

Set up PEARL in about ten minutes.

Five steps, each with a short video. No technical knowledge needed: if a step says “Terminal”, we show you exactly what to paste.

1

Download PEARL

The button picks the right file for your computer. If it asks, choose:

  • Mac with Apple Silicon (M1, M2, M3 or newer, macOS 11 or later). Mac with Intel (macOS 13 or later). Not sure? Apple menu → About This Mac: “Chip: Apple M…” is Apple Silicon, “Processor: Intel” is Intel.
  • Windows 10 or 11, 64-bit.
  • Linux: the .deb for Ubuntu and Debian, or the AppImage for any other.

For macOS, Windows, and Linux

2

Install it

Mac

  1. Open the downloaded .dmg file.
  2. Drag PEARL onto the Applications folder.
  3. Open PEARL from Applications or Launchpad. If the Mac asks whether to open an app from the internet, choose Open.

Windows

  1. Open the downloaded .exe file.
  2. If you see “Windows protected your PC”, choose More info, then Run anyway. (The installer is not signed by Microsoft yet.)
  3. Follow the installer, then open PEARL from the Start menu.

Linux

  1. .deb: open it with your software installer, or run sudo apt install ./ followed by the file name.
  2. AppImage: right-click → Properties → Permissions → allow it to run, then double-click it.
  3. On Ubuntu 22.04 or later the AppImage also needs libfuse2 (see Help below).

PEARL keeps itself up to date: when a new version is ready you’ll see Restart to update. The Linux .deb is the exception; download new versions from this site.

3

Choose the AI that does the thinking

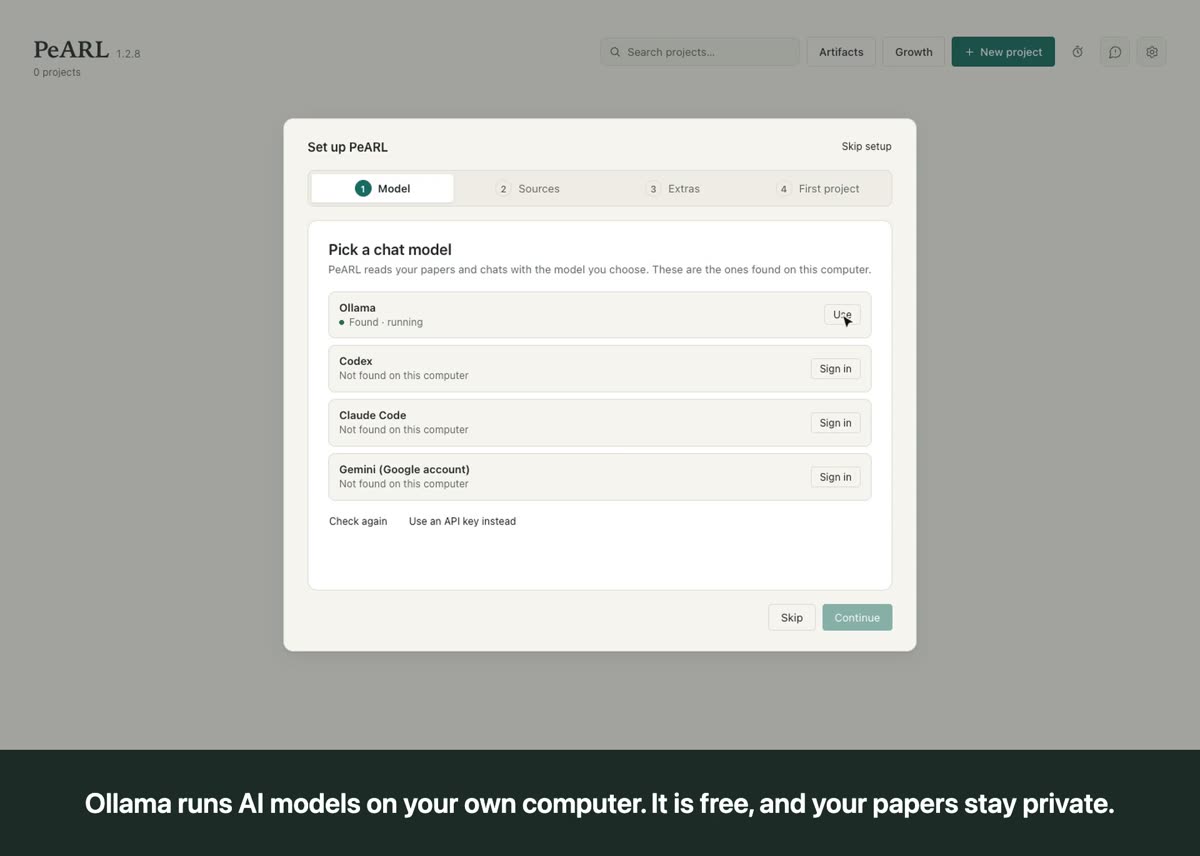
The first time PEARL opens, Set up PEARL asks you to pick a chat model. PEARL works with an AI you already have or can get for free. Pick one:

Free and private: Ollama

  1. Download Ollama from ollama.com/download, install it and open it once.
  2. Download the AI model, once. Open Terminal (Mac: press ⌘ Space and type Terminal) or PowerShell (Windows: Start menu, type PowerShell), paste this and press Return:
    ollama pull gemma4
    It downloads about 7–10 GB, so leave it running until it says success.
  3. Open PEARL and choose Use next to Ollama, as in the video.
Steps in this video
  1. When PeARL opens for the first time, it looks for AI tools on your computer.
  2. Ollama runs AI models on your own computer. It is free, and your papers stay private.
  3. Choose Use next to Ollama.
  4. Then press Continue.
  5. Connecting Zotero or Google is optional. You can do it later in Settings.
  6. The mathematics add-on lets PeARL read equations. Install it now or later.
  7. Last, give your first project a name.
  8. Press Create project.
  9. Your project is ready. Next, add your papers.

Your Claude or ChatGPT plan

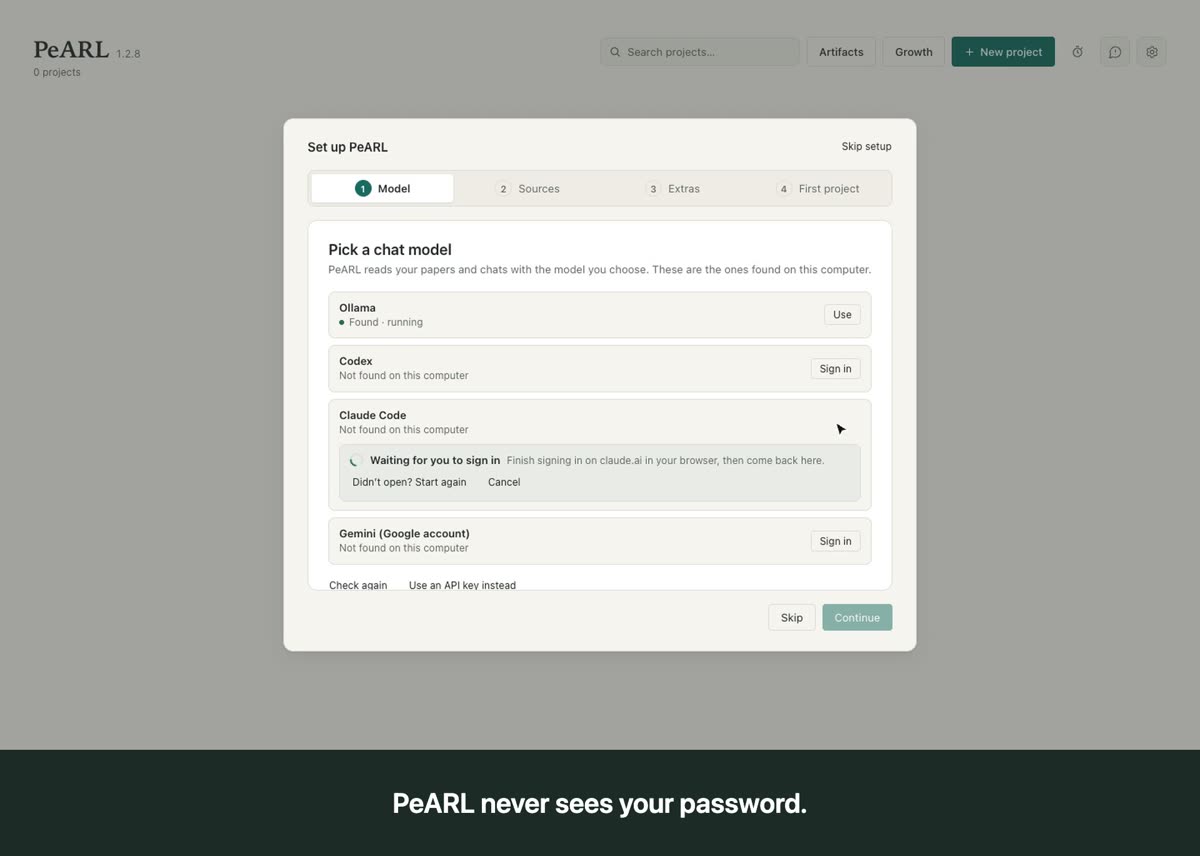
  1. In Set up PEARL (or Settings → Inference), press Sign in next to Claude Code or Codex (ChatGPT).
  2. PEARL installs what it needs and opens the sign-in page in your browser. Sign in there; PEARL never sees your password.
  3. Back in PEARL, choose Use and Continue.
Steps in this video
  1. Have a Claude Pro or Max plan? PeARL can use it.
  2. Choose Sign in next to Claude Code.
  3. PeARL installs what it needs if it is missing. This can take a minute.
  4. Claude’s sign-in page opens in your browser. Sign in there.
  5. PeARL never sees your password.
  6. Back in PeARL, Claude Code shows Found · signed in. Choose Use.
  7. Press Continue. PeARL now answers with your plan.
Watch the ChatGPT version
Steps in this video
  1. Have a ChatGPT Plus or Pro plan? PeARL can use it through Codex.
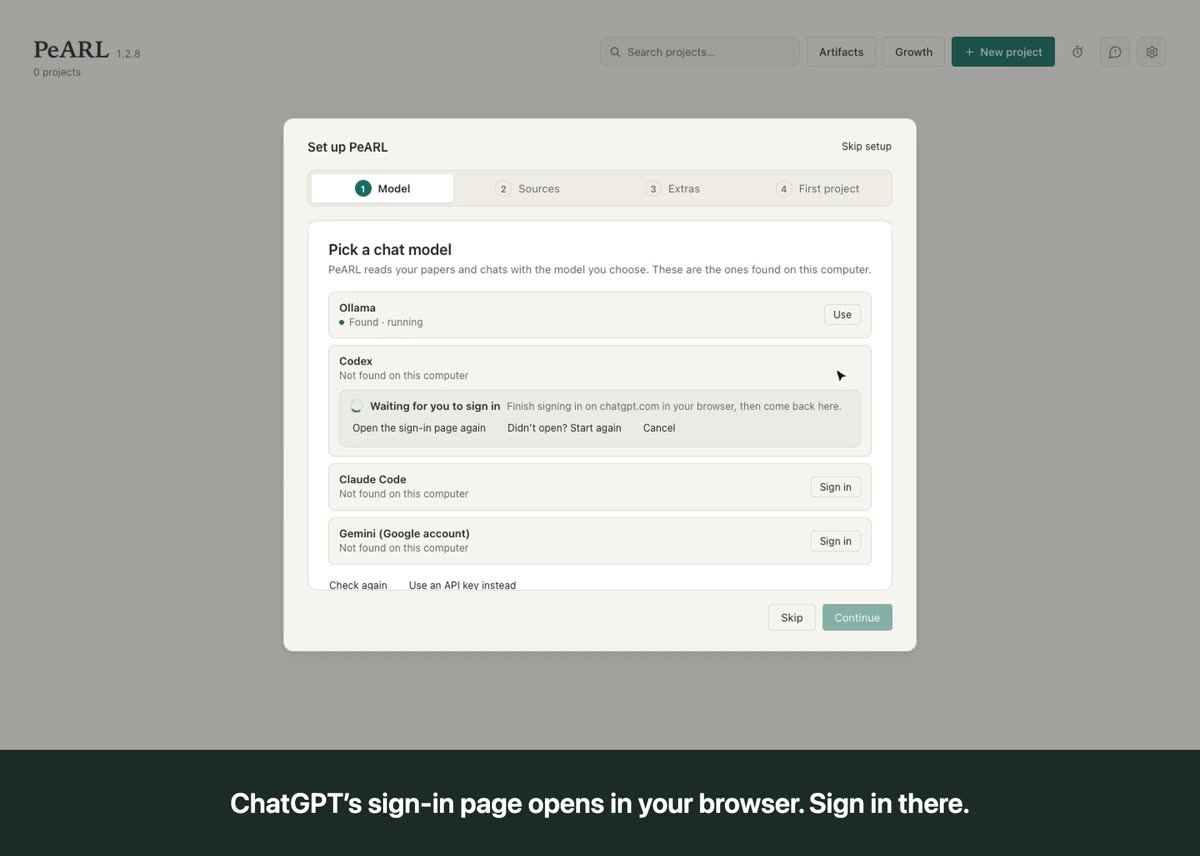
  2. Choose Sign in next to Codex.
  3. PeARL installs what it needs if it is missing. This can take a minute.
  4. ChatGPT’s sign-in page opens in your browser. Sign in there.
  5. PeARL never sees your password.
  6. Back in PeARL, Codex shows Found · signed in. Choose Use.
  7. Press Continue. PeARL now answers with your plan.

Pay as you go: an OpenRouter key

  1. Make a key at openrouter.ai/settings/keys and add some credit.
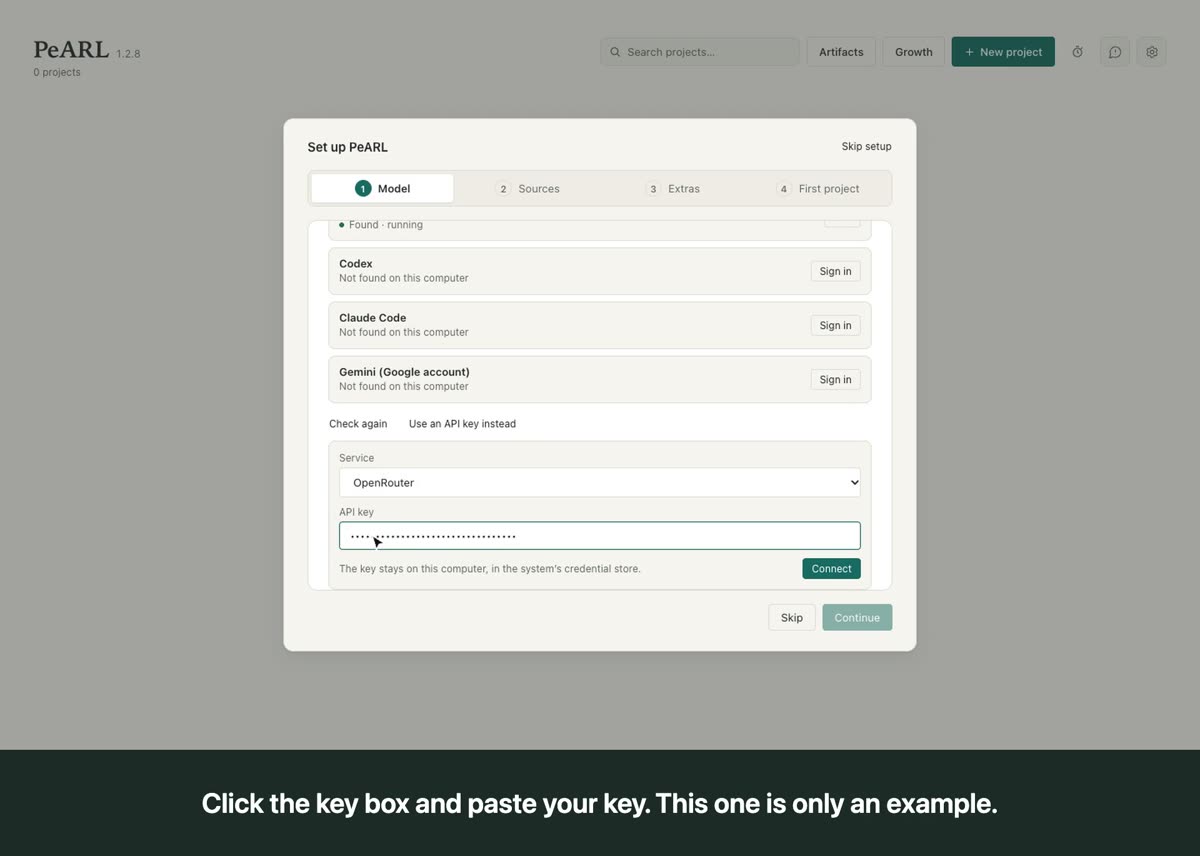
  2. In Set up PEARL, choose Use an API key instead, set Service to OpenRouter, paste the key and press Connect.
  3. The key is kept in your computer’s own secure storage (the Keychain on a Mac).
Steps in this video
  1. No subscription? You can use an API key from a service such as OpenRouter.
  2. Choose Use an API key instead.
  3. Under Service, pick OpenRouter.
  4. Click the key box and paste your key. This one is only an example.
  5. Then press Connect. The key stays on your computer, in its credential store.

Your Google account

  1. Press Sign in next to Gemini (Google account) and sign in with Google in your browser.
  2. Needs a Google AI Pro or Ultra plan.
  3. Please read the note PEARL shows first: Google’s terms restrict using its Antigravity tool through other apps, and Google may suspend accounts that do. If that worries you, choose another option.
Steps in this video
  1. Have a Google AI Pro or Ultra plan? PeARL can use Gemini with it.
  2. Choose Sign in next to Gemini (Google account).
  3. Read the caution: Google’s terms restrict using Antigravity through other apps.
  4. If you accept that, press Sign in with Google.
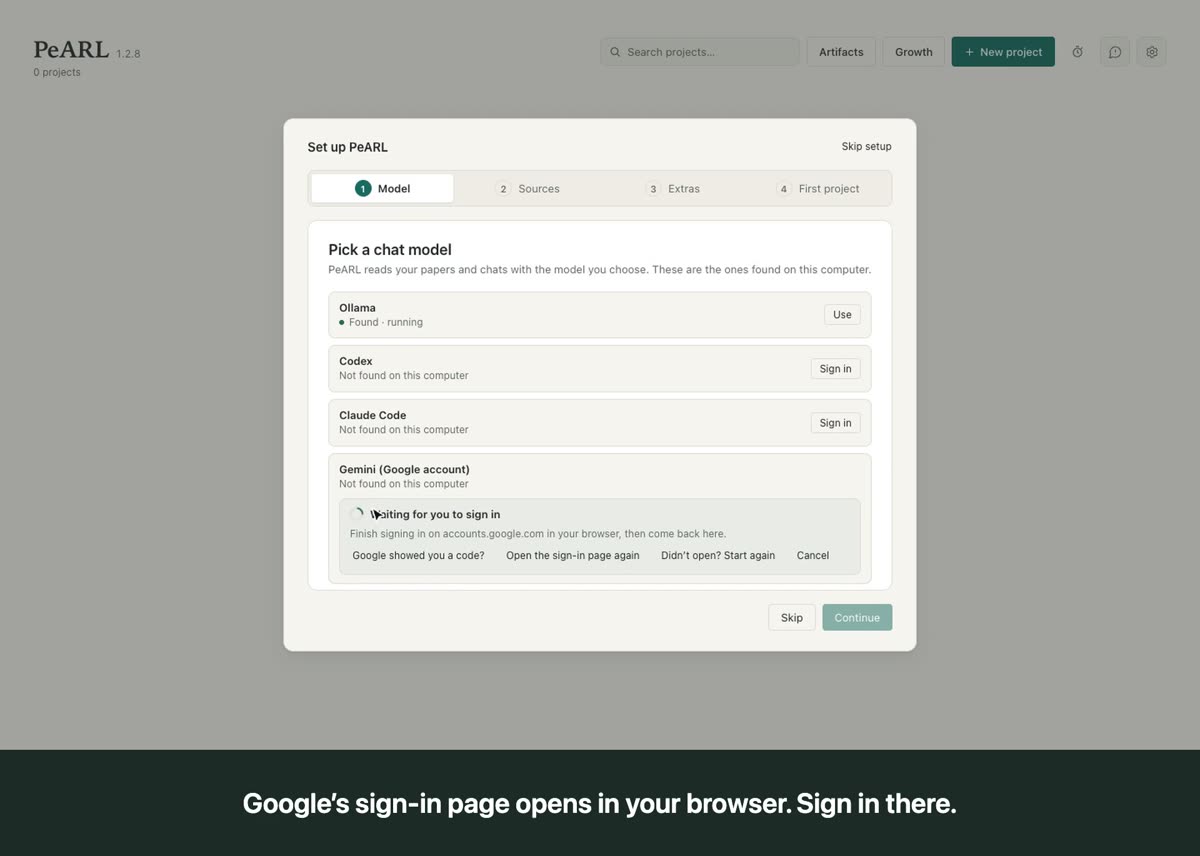
  5. Google’s sign-in page opens in your browser. Sign in there.
  6. PeARL never sees your password.
  7. Back in PeARL, Gemini (Google account) shows Found · signed in. Choose Use.
  8. Press Continue. PeARL now answers with your plan.

Change your mind later

Everything here can be changed in Settings → Inference. That is also where Quick tasks with lives: short jobs like Define, Explain and Today use a cheaper, faster model automatically, and you can pick a different one.

Steps in this video
  1. You can change the AI model PeARL uses at any time.
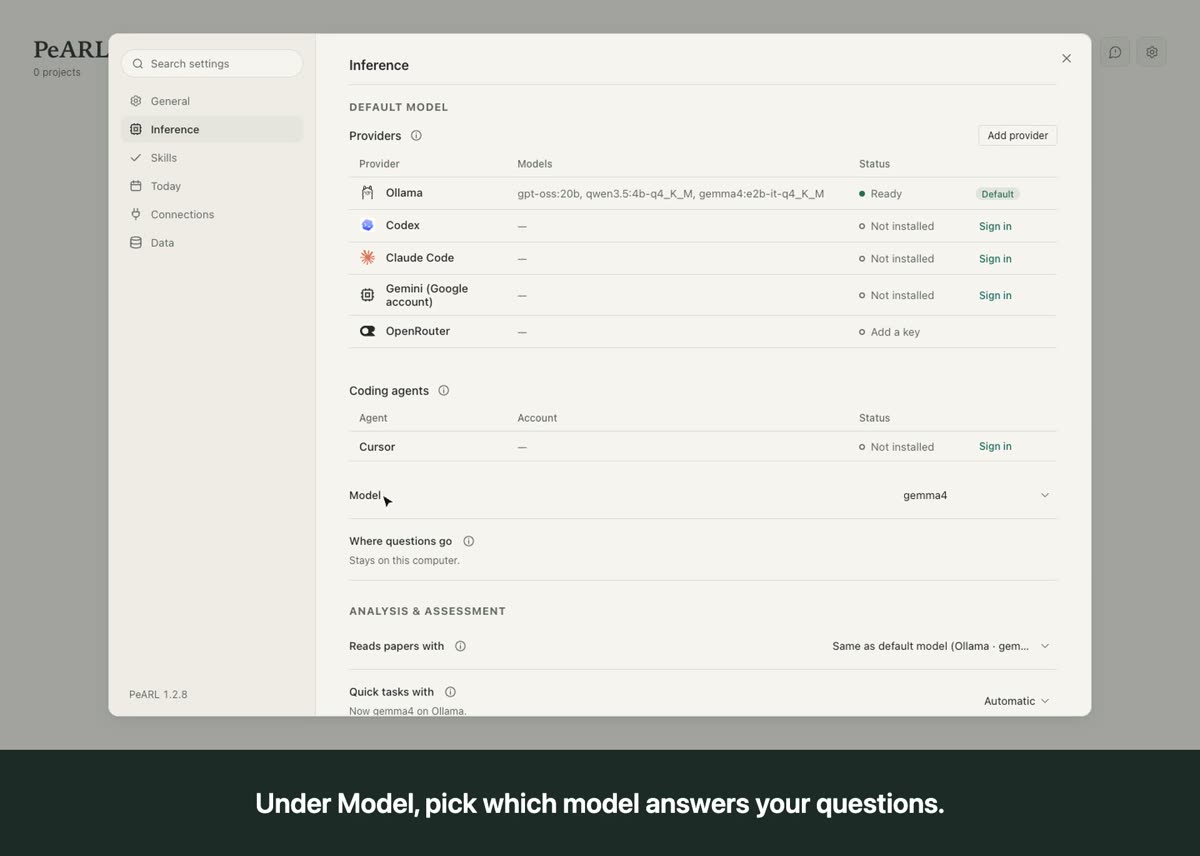
  2. Open Settings with the gear icon, then choose Inference.
  3. Providers lists every AI service you can use. “Default” marks the one in use.
  4. To use another, choose Sign in next to it, as in the sign-in videos.
  5. Under Model, pick which model answers your questions.
  6. Quick tasks with: short jobs such as definitions use a cheaper model automatically.
  7. Leave it on Automatic unless you want to choose.
4

Make a project and add papers

  1. A project is a folder for one question. Give it a name in setup, or press New project.
  2. Add papers: Add PDFs…, drag PDFs onto the library, or From the web… with a DOI, arXiv number or link. You can also bring them from Zotero or a reference file.
  3. You can read and ask about a paper as soon as it says it is ready. For the full structured summary, open the paper’s Summary tab and press Generate summary.
Steps in this video
  1. Your project is empty. Add your papers from the project home.
  2. Choose Add PDFs… and pick files from your computer.
  3. PeARL adds the file to your project. You can also drag PDFs in.
  4. No PDF yet? Choose From the web….
  5. Type a DOI, an arXiv number or a link, then press Find.
  6. PeARL found the paper. Press Import into project.
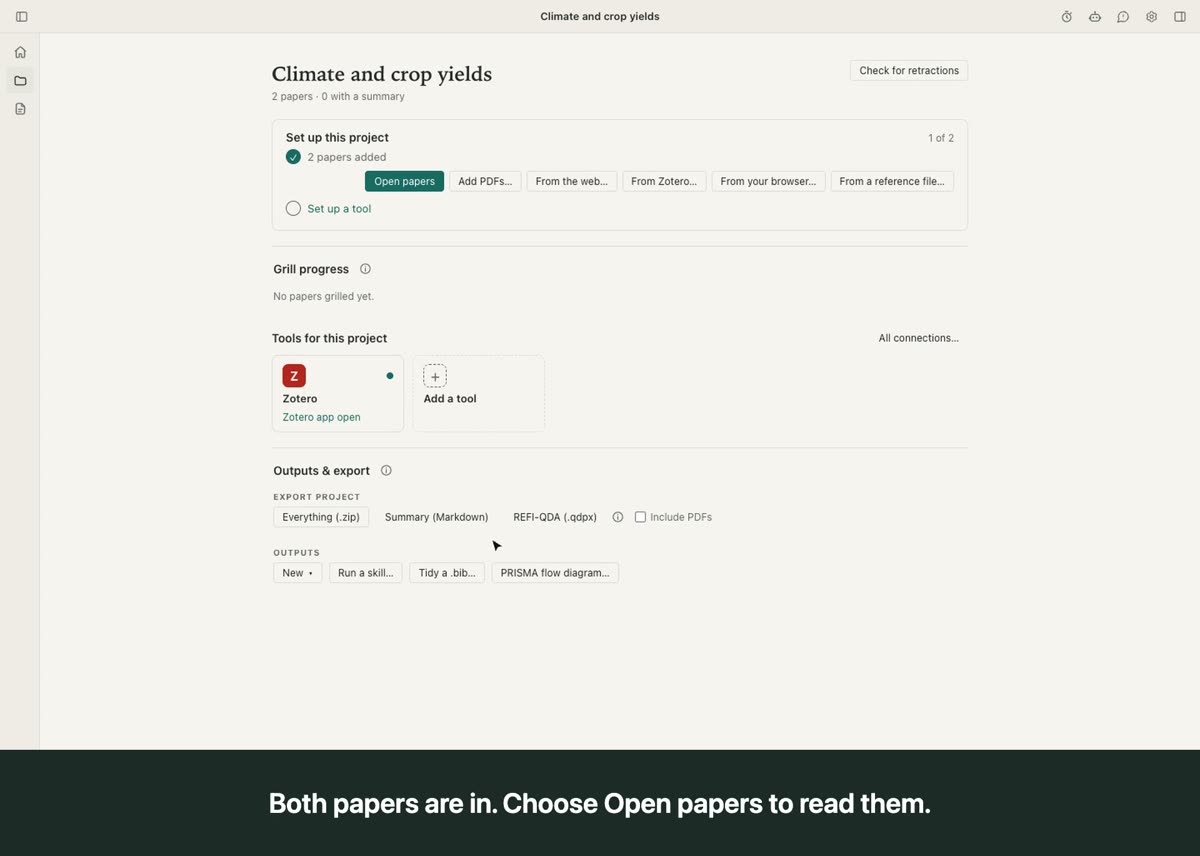
  7. Both papers are in. Choose Open papers to read them.
  8. Your papers are listed on the left. “Reading…” means PeARL is still preparing one.
  9. Click a paper to open it. Ask about it in the Assistant panel on the right.
5

Connect your other tools (optional)

  • Zotero: keep the Zotero app open and import collections.
  • Overleaf: paste an Overleaf Git token to write your paper in PEARL.
  • Obsidian and Notion: pick a vault folder, or share Notion pages with PEARL.
  • Microsoft Office: write into Word, PowerPoint and Excel files, even while they’re open.
  • Calendars and GitHub: for Today and for code.
Steps in this video
  1. Connections link PeARL to other tools you use. All of them are optional.
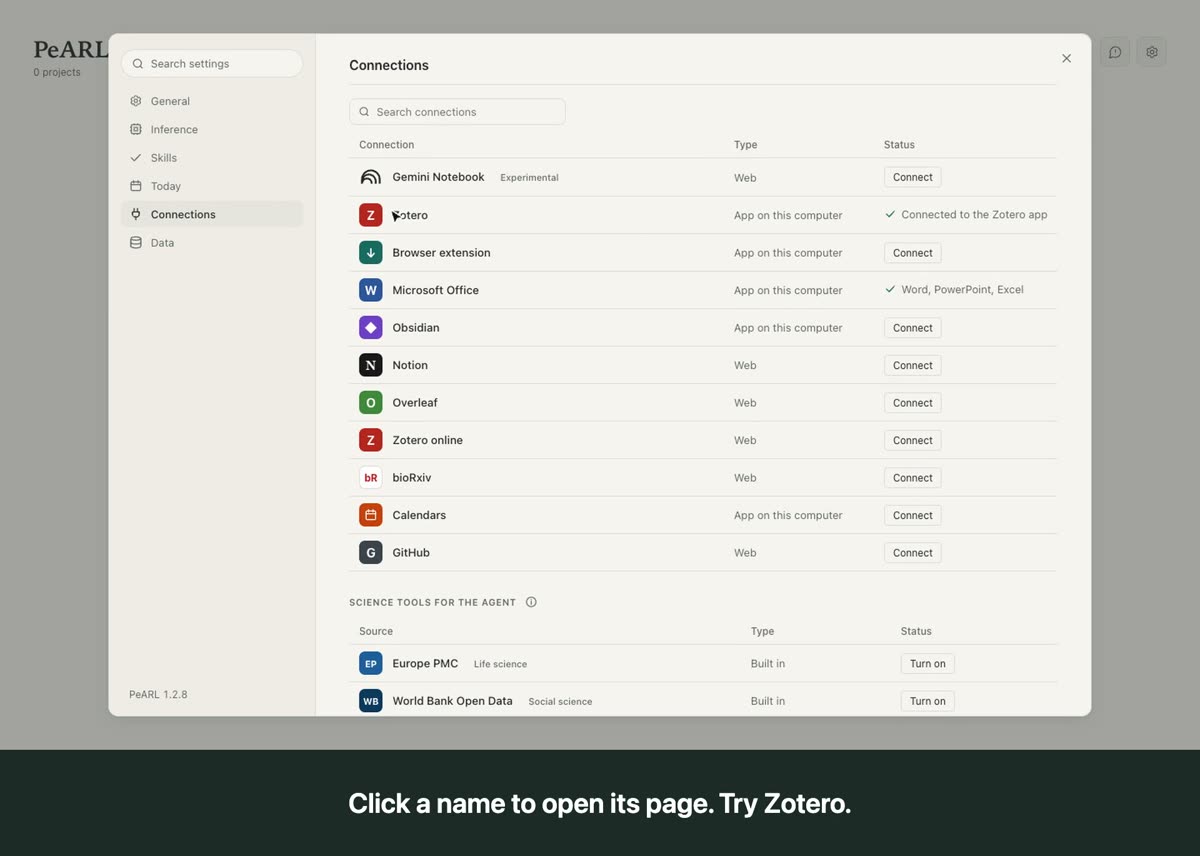
  2. Open Settings with the gear icon.
  3. Choose Connections.
  4. Each row is one tool. The last column says whether it is connected.
  5. Click a name to open its page. Try Zotero.
  6. Each page explains what the tool does. Choose All connections to go back.
  7. Skip any you do not need. You can connect them later.

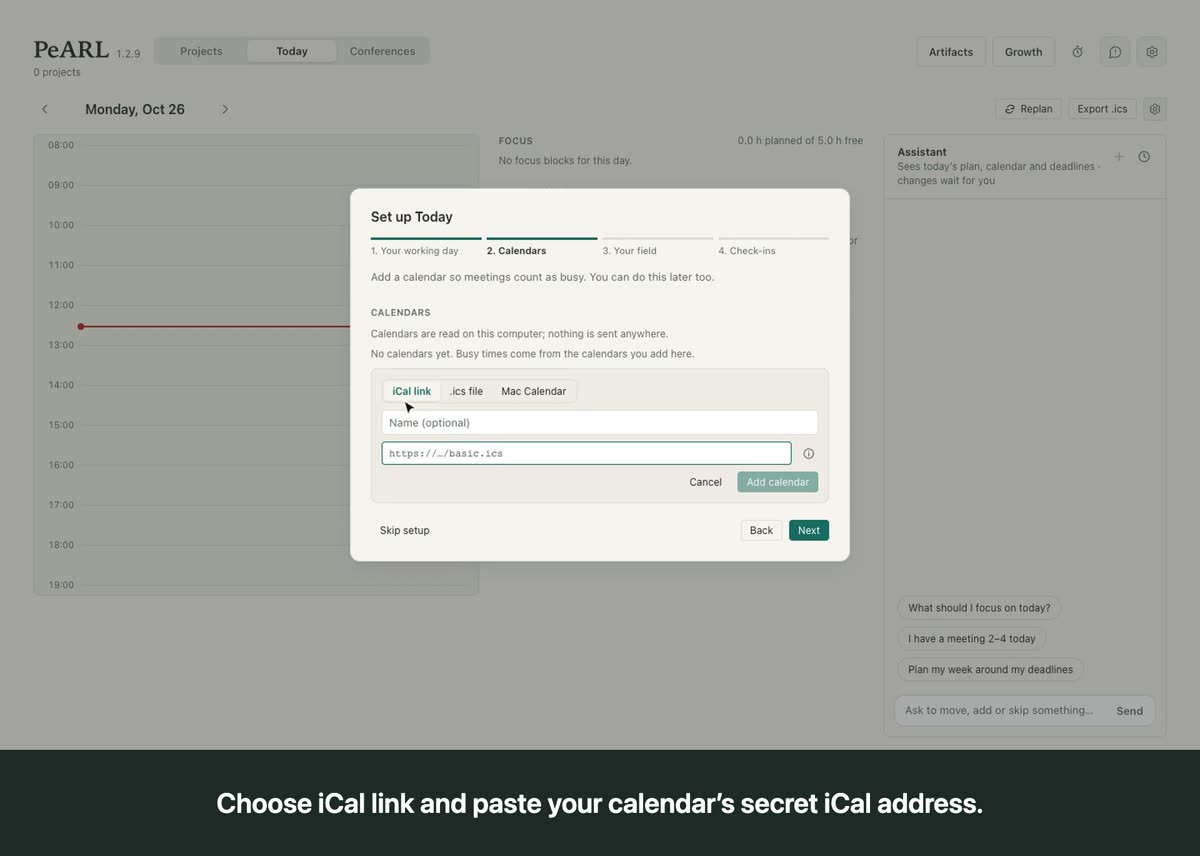
Want a day planner? Today plans focus time around your calendar and deadlines. Switch it on in Settings → Today, then open the Today tab. Four short steps follow:

  1. Your working day: hours, workdays and lunch.
  2. Calendars: paste your calendar’s iCal link, so meetings count as busy. On a Mac you can choose Mac Calendar instead.
  3. Your field: pick your field and subfields, and follow conferences with upcoming deadlines.
  4. Check-ins: when Today plans the morning and closes the day.
Steps in this video
  1. Today plans your day around your calendar and your deadlines. Here is how to set it up.
  2. Open Settings with the gear icon, choose Today and switch it on.
  3. Then open the Today tab. The first time, it walks you through four short steps.
  4. Step 1: your working day. Set your hours, your workdays and lunch.
  5. Step 2: add a calendar, so your meetings count as busy.
  6. Choose iCal link and paste your calendar’s secret iCal address.
  7. In Google Calendar: Settings → your calendar → Integrate calendar → Secret address in iCal format.
  8. In Outlook: Settings → Calendar → Shared calendars → Publish a calendar, then copy the ICS link.
  9. The calendar is read on this computer. On a Mac you can choose Mac Calendar instead.
  10. Step 3: your research field. PEARL suggests conferences with upcoming deadlines.
  11. Tick the conferences you want to follow. They come first, under Following, in the Conferences tab.
  12. Step 4: choose how Today checks in with you, morning and evening.
  13. Your meetings now show on the day as busy time. Today will not plan work over them.
  14. Change any of this later with the gear on the Today page.

All video guides

Something went wrong?

PEARL says “Ollama is not installed” or “not reachable”
Install Ollama from ollama.com/download and open it once. If it is installed but stopped, press Start server in PEARL’s Settings → Inference.
PEARL says “gemma4 is not installed”
Ollama is there but the model isn’t yet. Open Terminal (Mac) or PowerShell (Windows), paste the command below and wait for the download to finish.
ollama pull gemma4
Windows says “Windows protected your PC”
The installer isn’t signed by Microsoft yet. Choose More info, then Run anyway. Only do this for the file you downloaded from segaislabs.com.
My Mac says PEARL can’t be opened
The Mac installers are signed and checked by Apple, so this should not happen. Make sure you downloaded from segaislabs.com, then open System Settings → Privacy & Security and choose Open Anyway.
The Linux AppImage does nothing when I open it
Allow it to run first: right-click → Properties → Permissions → Allow executing file as program. On Ubuntu 22.04 and later it also needs one system package:
sudo apt install libfuse2
On Ubuntu 24.04 the package is called libfuse2t64.
The sign-in page never opened, or I closed it
In PEARL press Open the sign-in page again, or Didn’t open? Start again. A sign-in left for ten minutes stops on its own; press Try again.
A model says “Not signed in”
Go to Settings → Inference and press Sign in on that row. Claude needs a Pro or Max plan, ChatGPT a Plus or Pro plan, Google a Google AI Pro or Ultra plan.
OpenRouter does not accept my key
Make a new key at openrouter.ai/settings/keys, paste it in Settings → Inference → OpenRouter, and check you have credits.
A paper shows “no text”
The PDF is a scanned picture of pages with no text inside. Try a different copy of the paper, for example from the publisher or arXiv.
Equations are missing from a paper
Install the mathematics add-on: Settings → Inference → Mathematics → Install. Papers you add after that keep their equations.
“The papers do not fit the model’s context window”
You asked about more text than the model can hold at once. Ask about one paper at a time, or with Ollama raise Context window in Settings → Inference → Server if your computer has the memory.
Word, PowerPoint or Excel won’t take PEARL’s changes (Mac)
Open System Settings → Privacy & Security → Automation and allow PEARL to control the Office app.
Where do I find my calendar’s iCal link?
Google Calendar (on a computer): the gear → Settings → choose your calendar under “Settings for my calendars” → Integrate calendar → copy Secret address in iCal format. Outlook on the web: Settings → Calendar → Shared calendars → Publish a calendar, choose the calendar, Publish, then copy the ICS link. On a Mac, choose Mac Calendar in PEARL instead; it reads the calendars already in the Calendar app. Keep the link private: anyone who has it can see your calendar.
My university or work calendar has no iCal link
Your organization’s admin can turn calendar sharing off, so the option may be missing. If the calendar is in the Mac’s Calendar app, choose Mac Calendar. Otherwise export the calendar as an .ics file and choose .ics file in PEARL; it is a snapshot, so export it again when your schedule changes. Or ask your IT team whether calendar publishing can be turned on.
I want to see the setup steps again
Settings → General → Run setup again. For Today, the gear on the Today page → Run setup again.

Still stuck? Tell us

In PEARL, open Help → Send Feedback… (or the speech-bubble button next to Settings) and choose Report an issue. Tick Include app logs so we can see what happened; your home folder and keys are hidden from the logs.

Want to understand the tools first? How PEARL works →